Here is a short 8min video tutorial on using some of the Effects, Alignments and Pathfinder operations in Illustrator from a nice site, Method & Craft. He's quick so you may need to watch it a few times. Hopefully they will be adding more videos and tutorials soon.
The Pathfinder operations in particular I think will be most useful for creating more complex shapes in your drawings.
Thursday, 24 March 2011

Thursday, 17 March 2011
Zooming in, zooming out, zooming in...
Save yourself the headache of constantly zooming in to work on detail and then having to zoom out again to get an overview of the whole image.
Go to Window and make a New Window. This will give you a second view of the same document.
Make one of the windows zoomed in to work in detail and the second one zoomed out to work at a distance.


Go to Window and make a New Window. This will give you a second view of the same document.
Make one of the windows zoomed in to work in detail and the second one zoomed out to work at a distance.

The clever thing is now to learn the keyboard shortcut to switch between the two.
Hold the cmd and tilde key, which looks like this.
You can then quickly move back and forth between the two with the shortcut and any changes to the drawing you make in one will be changed in the other. Nice.
Tuesday, 15 March 2011
Templates in Adobe Illustrator
If you want to draw over an image as a template or guide Place the image by clicking File, Place.. and locate your image file.
Once you have resized it to fit your document, click in the Layers palette submenu and select Template.

This will in one hit lock your image and slightly reduce it's opacity.

Once you have resized it to fit your document, click in the Layers palette submenu and select Template.

This will in one hit lock your image and slightly reduce it's opacity.

Now you just need to create a new layer in which to draw on.
Thursday, 10 March 2011
Photoshop: Clipping Masks
So you have an idea of what a layer mask is and how it works (as illustrated below) and want to add another to your set of techniques.
The next one you might want to learn about is called a Clipping Mask.
A clipping mask allows you to show or hide selected parts of an image depending on the pixels above it.

Here is the Adobe Photoshop manual explanation:
Clipping Masks
The next one you might want to learn about is called a Clipping Mask.
A clipping mask allows you to show or hide selected parts of an image depending on the pixels above it.

Hold down Alt while click between the layers in the Layers palette. You need to be able to see the double circle cursor.
The Duck layer in this example has some transparent pixels. You can see this by the checkerboard design in the thumbnail behind the yellow duck.
The non-transparent pixels reveal the pixels of the layer above it. So the Kaleidoscope layer is clipped where there are no pixels in the layer below.
It might help to think of the pixels above being caught by the layer pixels below and everything else just falls away.
Here is the Adobe Photoshop manual explanation:
Clipping Masks
Wednesday, 9 March 2011
Photoshop: Layer Mask.
Rather than using the eraser tool to delete portions of an image (because once pixels are gone they are gone) why not use a layer mask.
Masks are a way to hide portions of an image on lower layers based on areas of black or white, including levels of grey.
Once you understand what the layer mask is doing and how it works you can achieve much more than just using the eraser tool.
The example below shows a layer mask that has been added to the top layer.
Click on the images to get a larger view.


Masks are a way to hide portions of an image on lower layers based on areas of black or white, including levels of grey.
Once you understand what the layer mask is doing and how it works you can achieve much more than just using the eraser tool.
The example below shows a layer mask that has been added to the top layer.
Click on the images to get a larger view.

The layer mask is the black and white thumbnail to the right of the image in the layers palette. It is important to notice when the layer mask is selected by the frame around it's thumbnail.
The black ink on the mask thumbnail can thought of as a hole that is cut through the image revealing the layer below.

This also works with values of grey. In the example above the gradient runs from black to white through grey values. So painting with grey ink will make the underlying image semi-opaque.
The mask becomes really useful once you realise that you removed something from an image you thought you didn't need. You can alway go back and paint with white to restore the image.
Look at this link for a fuller explanation of using the layer mask.
What is a layer mask?
Photoshop CS4: Layer Masks in Depth | by Jan Kabili
View this entire Photoshop course and more in the lynda.com Online Training Library®.
Tuesday, 8 March 2011
Wednesday, 2 March 2011
How to create Colour Separations in Photoshop.
This blog entry gives you instructions on how to create a four colour separation (CMYK) from Photoshop.
This will enable you to prepare a screen for printing textiles.
Please follow the steps carefully as it is important to keep the images in registration with each other for the final print to work.
1. Open your image file
2. Convert it to CMYK if not already. (Image>Mode>CMYK) and flatten the image. (Layer>Flatten Image)
3. In the channels palette, select Split Channels from the pop-out menu in the top right hand corner. This will give you four separate black and white images each with Cyan, Magenta, Yellow or Black at the top of the window.

4. Save each file with a unique name. Preferably with Cyan, Magenta, Yellow or Black in the title.
5. You will now apply the halftone screen patterns to each of the images.
a. For each file go to the Image menu; select Mode; select Bitmap.
b. In the Bitmap dialogue box, select Halftone Screen and set the output to 300dpi.
c. You will then get a dialogue box asking you to enter the screen angles and frequencies and they are as follows. For each one select the shape as round.
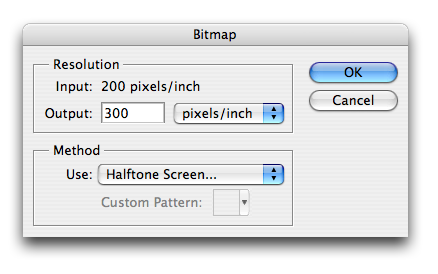

6. Enter in these figures for each of the colour screens.
Colour: Frequency / Angle
Cyan: 31.622 / 18.434
Magenta: 31.622 / 71.565
Yellow: 33.333 / 0.0
Black: 35.355 / 45.0
7. Save your files.
8. Select one of your files and in the top menu bar click Select, All, then Edit, Copy to copy the image into memory.
9. Select New... from the File menu. This will create a blank page the same size, Bitmap mode type and resolution as the one you just copied.
10. Go to Image in the top menu bar and select Canvas Size. Add 3cm to both of the height and width dimensions here. This will give you an extra 1.5cm space on each edge to add some registration marks.

12. Clicking on this link will open the file: 14066_69_1.jpg. You will need to save this somewhere, ideally to the desktop of your machine.
13. Open this file, Copy and Paste it to your new blank document. It should appear somewhere on your page. Move this to one of the corners of the page using the Move tool.

14. Select Paste again (it will paste directly on top of the old registration mark) then using the Move tool move this new mark to another corner, complete the previous step putting a registration mark into each corner. Remember that in Bitmap mode layers are not supported so you will need to correctly place each of the marks before you paste the next mark. You should now have a blank page, slightly bigger than your image with little registration marks in each corner.
15. Save this file with the reg marks as “Blank page” or similar.
16. Now you will copy each of your Cyan, Magenta, Yellow and Black screens into the blank page with the reg marks.
17. Select one of your C, M, Y, K, screens and Select, All, Copy. Select the “Blank page” with reg marks image and Paste. This should paste the image into the exact centre of the blank page with registration marks around the edge. If it doesn’t for some reason, make sure that when you select Paste you can see the whole of the image if not it may move the pasted image off centre.
18. You will want to put a small letter C, M, Y or K somewhere in the margin to indicate which screen is which when you come to print them. Do this with the Type tool in the tool palette.
19. Save as… your file making sure you add Cyan, Magenta, Yellow or Black to the title to help you identify the file.
20. Reopen the blank original file with the registration marks and continue with the other screens from step 16. Remember to save each file with a unique name so you can go back and open the original blank file each time.
21. You are now ready to print!
Subscribe to:
Posts (Atom)