Thursday 9 October 2008

Remove fringe. 03

A further technique and possibly the better of the three is to use the Clone Stamp tool.
This technique has the advantage of giving you more control in the colour, tone and placement of the pixels.

1. First we must lock the transparent pixels in the layer. Ensure you are targeting the correct layer. As before the background should be transparent.
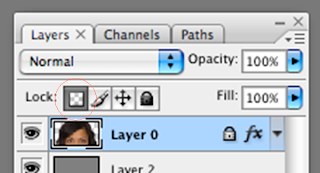

2. Select the Clone Stamp tool and set the mode to Darken. A low flow rate will give you more control.


3. Sample pixels close to the area you are cloning, this way the pixels will be of similar tone, colour etc. Remember to keep resampling the area to break up any patterns that can develop with this tool.


What you may find in this instance is that the strands of hair become thicker and heavier and might even reveal strands or pixels that you couldn't see previously.


Remove fringe. 02

So if you find that the removal of the white fringing from the previous technique didn't quite cut it, I'd recomend this next step to further enhance the results.

It is quite straight forward really, what we are going to try and achieve is to darken, selectively parts of the image.


Here is the image as it ended up in the previous technique. What you might be able to pick out are the small areas of lighter pixels around the finer parts of the strands of hair.

Here is the example in detail.


1. We need to select the Burn tool and change the range to Highlights. This way only the light pixels will be affected.

2. Now apply the Burn tool to the light edge darkening any fringe remaining. Be careful not to darken into the image too much or you will end up with an obvious dark shadow around the image.


As mentioned in the Russell Brown tutorial there is another slightly better technique that could be used in this instance which follows.

Friday 3 October 2008

Remove fringe. 01

This technique works best I find with images that are dark but have a light or white fringe from the background, so can be quite limited in it's usage.


Here is the original QT Movie from The Russell Brown Show.

A quick distillation of the process involved.

1. Delete as much as possible of the background to transparency, possibly leaving you with a white fringe around the edge.
2. If you change the blend mode of the layer with the fringe to Multiply you will get an idea of the resulting edge quality.
3. Change the layers blend mode back to Normal if not already.
4. In the layers palette double click to the right of the text, this will open up the Layer Style dialogue box.


5. Tick the Inner Glow style checkbox and click on the name Inner Glow to open this into the right hand panel.
6. Change the Blend mode to Multiply and select black as the solid colour. You could also click in the main image and pick a tone from here.
7. Change the Technique to Precise this can give you a better edge.
8. The size in pixels will determine how much of the edge detail will be effected.
9. Adjust the Opacity to give you a more subtle blend.

Some parts of the image may still need to be tweeked. If so then I'd recomend this next process...

Thursday 2 October 2008

Photoshop tips.

I've decided to create a whole lot of blog to record helpful Photoshop and Illustrator techniques. Primarily of course to help and inform but also to collate a body of knowledge should I loose my notebook.

I can't make any claim to have invented all of these techniques by myself but most have been found lying around here and there, as one does. I'll post all the relevant links to the originals where I can.

Because I find it frustrating trying to find interesting and useful Photoshop techniques from reams of pages of poop, hopefully this might act as some kind of poop-filtering-collator.

Finally, if you find something of interest please post a comment here and spread the word.
And if you wish to be a regular contributor please ask and I'll send you an invite to become an author.


Chris.