This blog entry gives you instructions on how to create a four colour separation (CMYK) from Photoshop.
This will enable you to prepare a screen for printing textiles.
Please follow the steps carefully as it is important to keep the images in registration with each other for the final print to work.
1. Open your image file
2. Convert it to CMYK if not already. (Image>Mode>CMYK) and flatten the image. (Layer>Flatten Image)
3. In the channels palette, select Split Channels from the pop-out menu in the top right hand corner. This will give you four separate black and white images each with Cyan, Magenta, Yellow or Black at the top of the window.

4. Save each file with a unique name. Preferably with Cyan, Magenta, Yellow or Black in the title.
5. You will now apply the halftone screen patterns to each of the images.
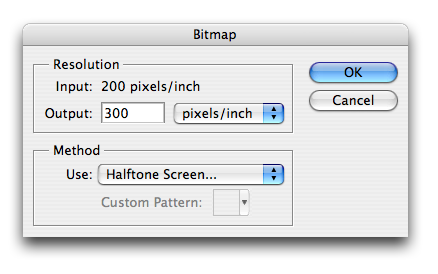
a. For each file go to the Image menu; select Mode; select Bitmap.
b. In the Bitmap dialogue box, select Halftone Screen and set the output to 300dpi.
c. You will then get a dialogue box asking you to enter the screen angles and frequencies and they are as follows. For each one select the shape as round.

6. Enter in these figures for each of the colour screens.
Colour: Frequency / Angle
Cyan: 31.622 / 18.434
Magenta: 31.622 / 71.565
Yellow: 33.333 / 0.0
Black: 35.355 / 45.0
7. Save your files.
8. Select one of your files and in the top menu bar click Select, All, then Edit, Copy to copy the image into memory.
9. Select New... from the File menu. This will create a blank page the same size, Bitmap mode type and resolution as the one you just copied.
10. Go to Image in the top menu bar and select Canvas Size. Add 3cm to both of the height and width dimensions here. This will give you an extra 1.5cm space on each edge to add some registration marks.

12. Clicking on this link will open the file: 14066_69_1.jpg. You will need to save this somewhere, ideally to the desktop of your machine.
13. Open this file, Copy and Paste it to your new blank document. It should appear somewhere on your page. Move this to one of the corners of the page using the Move tool.

14. Select Paste again (it will paste directly on top of the old registration mark) then using the Move tool move this new mark to another corner, complete the previous step putting a registration mark into each corner. Remember that in Bitmap mode layers are not supported so you will need to correctly place each of the marks before you paste the next mark. You should now have a blank page, slightly bigger than your image with little registration marks in each corner.
15. Save this file with the reg marks as “Blank page” or similar.
16. Now you will copy each of your Cyan, Magenta, Yellow and Black screens into the blank page with the reg marks.
17. Select one of your C, M, Y, K, screens and Select, All, Copy. Select the “Blank page” with reg marks image and Paste. This should paste the image into the exact centre of the blank page with registration marks around the edge. If it doesn’t for some reason, make sure that when you select Paste you can see the whole of the image if not it may move the pasted image off centre.
18. You will want to put a small letter C, M, Y or K somewhere in the margin to indicate which screen is which when you come to print them. Do this with the Type tool in the tool palette.
19. Save as… your file making sure you add Cyan, Magenta, Yellow or Black to the title to help you identify the file.
20. Reopen the blank original file with the registration marks and continue with the other screens from step 16. Remember to save each file with a unique name so you can go back and open the original blank file each time.
21. You are now ready to print!
No comments:
Post a Comment